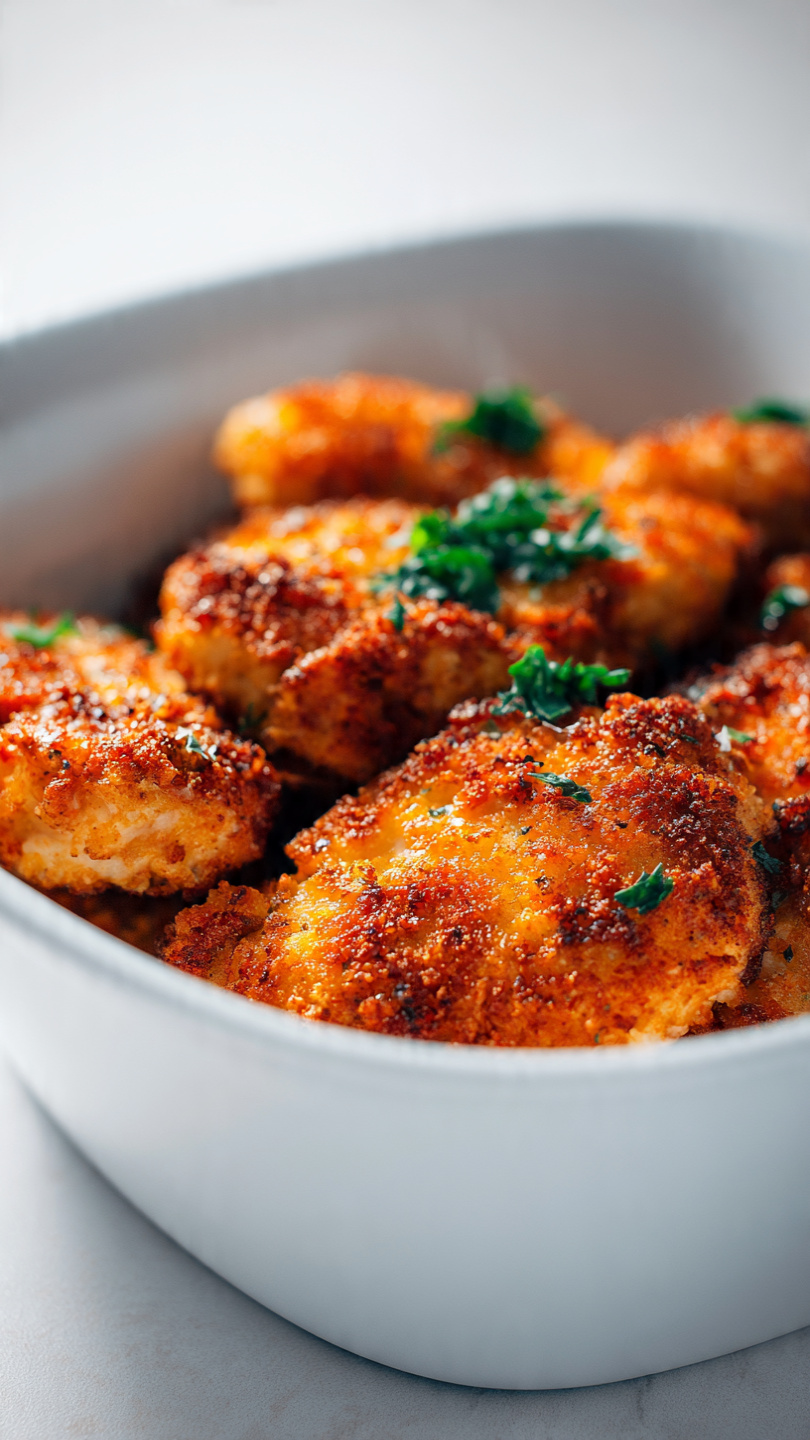
Crispy Breaded Chicken Tenders (Baked, Not Fried!)
These golden, crispy breaded chicken tenders are baked to perfection with a crunchy seasoned coating and juicy interior. The easiest homemade breaded chicken recipe your whole family will beg for on repeat.

The Only Homemade Breaded Chicken Recipe You Will Ever Need
Let's be honest: there is something deeply satisfying about a chicken tender that is genuinely crispy on the outside, impossibly juicy on the inside, and seasoned like it was made by someone who actually cares. These baked breaded chicken tenders are exactly that. No deep fryer, no greasy splatter, no babysitting a pot of oil. Just golden, crunchy, flavor-packed chicken breast tenderloins that come out of your oven looking and tasting like they came from a really good restaurant.
Whether you are looking for quick chicken tenderloin recipes for dinner, trying to nail the best baked chicken tenders for a crowd, or just want a reliable, simple breaded chicken recipe that works every single time, you have landed in the right place.
Why Baked Beats Fried (At Least on a Tuesday)
Frying chicken tenders is undeniably delicious, but it is also messy, time-consuming, and leaves your kitchen smelling like a fast food joint until Thursday. Baking on a wire rack is the move that changes everything. Here is why it works so well:
- The wire rack lets hot air circulate underneath the tenders, crisping the bottom just as much as the top
- You get a consistent golden crust without flipping a dozen times
- A quick spray of olive oil before baking mimics the light coating you would get from a shallow fry
- The oven does all the work at a blazing 425 degrees F, which creates steam-free, crackling-hot air that crisps breadcrumbs fast
This method is the foundation of every great baked chicken breast tenderloin recipe, and once you try it, you will never go back to the sheet pan alone.
Before we get into the how, it is worth saying that the right tools genuinely make a difference here. A sturdy wire rack that fits inside your baking sheet, a reliable instant-read thermometer, and a good olive oil mister are the three pieces of gear that take these tenders from good to genuinely great.
The Secret Is in the Three-Station Breading Setup
If you have ever made homemade breaded chicken and ended up with coating that falls off or turns gummy, the three-station breading line is your fix. It is not complicated. It is just disciplined.
Station 1: Seasoned flour. This dry base coat helps the egg wash stick instead of sliding right off the chicken.
Station 2: Beaten egg. The egg acts as the glue between the flour and the breadcrumbs. Let the excess drip off so you do not get clumpy patches.
Station 3: Seasoned panko with parmesan. This is where the magic lives. Panko breadcrumbs are lighter and coarser than regular breadcrumbs, which means more surface area, more crunch. The parmesan adds a subtle savory depth that is hard to put your finger on but impossible to skip.
Chef's Tip: Press the tenders firmly into the panko mixture rather than just rolling them. You want every square inch of that surface packed with breadcrumbs. Loose panko = sad crust.
The seasoning blend in this recipe, smoked paprika, garlic powder, onion powder, and oregano, is calibrated to taste great on its own and pair well with every classic dipping sauce from honey mustard to spicy ranch.
Tips for the Juiciest Chicken Breast Tenderloins
The tenderloin cut is naturally suited for fast, high-heat cooking. It is thin, tender (hence the name), and cooks through quickly without drying out if you follow a couple of key rules:
- Pat the chicken completely dry before breading. Surface moisture is the enemy of a crispy crust and also causes the chicken to steam rather than roast.
- Do not overcrowd the rack. Space between each tender is not optional. Crowding traps steam and turns your crunchy coating soft.
- Pull at 165 degrees F, not a degree higher. An instant-read thermometer is the single best investment you can make for breast tenderloin recipes that stay juicy every time.
- Rest for 3 minutes before serving. The juices redistribute and the crust firms up just a touch more while the interior finishes evening out.
Chef's Tip: If your tenderloins are on the thicker side, you can gently pound them to an even thickness between two sheets of plastic wrap. Even thickness means even cooking.
Serving Ideas That Actually Make Sense
These breaded chicken tender recipes are endlessly versatile. Here are a few directions you can take them:
- Classic: Honey mustard, barbecue sauce, or spicy sriracha mayo alongside a simple slaw
- Family dinner plate: Roasted sweet potato wedges and steamed broccoli for a complete, balanced meal
- Salad topper: Slice and fan over a Caesar or a chopped romaine with avocado and corn
- Game day platter: Line them up on a big board with four or five dipping sauces and let people go
Ready to make the best batch of homemade breaded chicken you have ever had? Here is the full recipe:
Crispy Breaded Chicken Tenders (Baked, Not Fried!)
These golden, crispy breaded chicken tenders are baked to perfection with a crunchy seasoned coating and juicy interior. The easiest homemade breaded chicken recipe your whole family will beg for on repeat.
Ingredients
- 1 1/2 lb chicken breast tenderloins, patted dry
- 1 1/2 cups panko breadcrumbs
- 1/2 cup all-purpose flour
- 2 large eggs, beaten
- 1/4 cup grated parmesan cheese, finely grated
- 1 tsp garlic powder
- 1/2 tsp onion powder
- 1 tsp smoked paprika
- 1/2 tsp dried oregano
- 1 tsp kosher salt, divided
- 1/2 tsp black pepper, freshly ground
- 1 tbsp olive oil spray, or use a mister
Instruction
Preheat your oven to 425 degrees F (220 degrees C). Line a large baking sheet with a wire rack and lightly coat the rack with olive oil spray.
Set up a three-station breading line: place the flour seasoned with a pinch of salt and pepper in the first shallow bowl, the beaten eggs in the second, and the panko breadcrumbs mixed with parmesan, garlic powder, onion powder, smoked paprika, oregano, remaining salt, and pepper in the third.
Pat the chicken tenderloins completely dry with paper towels. This step is critical for getting a crispy crust.
Working one at a time, dredge each tenderloin in the flour, shaking off any excess. Dip it into the egg wash, letting any drips fall back into the bowl. Then press it firmly into the panko mixture on both sides until well coated.
Arrange the breaded tenders in a single layer on the prepared wire rack. Do not overlap them.
Spray the tops of the tenders generously with olive oil spray. This is what gives you that deep golden color without frying.
Bake for 18 to 22 minutes, flipping once halfway through, until the coating is deep golden brown and the internal temperature reads 165 degrees F (74 degrees C) on an instant-read thermometer.
Remove from the oven and let rest for 3 minutes before serving. Serve immediately with your favorite dipping sauce.
Equipment
- Large rimmed baking sheet
- Wire cooling rack
- 3 shallow bowls or plates
- Instant-read meat thermometer
- Olive oil spray mister
- Tongs
Notes
Storing and Reheating Like a Pro
Leftovers, if you have any, keep well. Store cooled tenders in an airtight container in the fridge for up to 3 days. When it is time to reheat, skip the microwave entirely. A hot oven at 375 degrees F for 8 to 10 minutes, or a quick run through the air fryer at 375 degrees F for 4 to 5 minutes, will bring that crust right back to life.
For longer storage, these simple breaded chicken recipes freeze beautifully. Lay baked tenders on a sheet pan, freeze until solid, then transfer to a freezer bag. They keep for up to 2 months and go straight from frozen to a 400 degree F oven in about 12 to 15 minutes. Weeknight dinner, solved.